- choose-the-right-location-for-your-trampoline
- understanding-trampoline-types-and-kits
- preparation-checklist-before-assembly-begins
- step-by-step-guide-to-trampoline-setup
- safety-measures-during-and-after-installation
- real-life-experience-from-a-trampoline-zone-customer
- maintaining-your-trampoline-throughout-the-seasons
1. Choose the Right Location for Your Trampoline
Before you even unpack your trampoline box, choosing the ideal spot in your yard is critical. Look for level ground with plenty of overhead clearance—no power lines, trees, or roof edges. Avoid placing trampolines on concrete or hard surfaces unless you have shock-absorbing mats. A grassy area with ample space around the frame is ideal. Many Trampoline Zone customers recommend positioning the trampoline in a shaded area to avoid overheating during summer months.
2. Understanding Trampoline Types and Kits
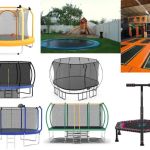
Trampolines aren’t one-size-fits-all. Round models are great for families and backyard use, while rectangular ones are preferred for gymnastics and higher bounces. There are also mini fitness trampolines and oval versions that combine balance and performance. Most kits from reputable suppliers like Trampoline Zone include a frame, springs, mat, safety net, and ladder. Double-check what's included to avoid mid-assembly surprises.
3. Preparation Checklist Before Assembly Begins
To make your trampoline setup seamless, have these ready beforehand:
- Rubber mallet (for securing frame pieces)
- Spring pull tool (included in most kits)
- Protective gloves
- At least two people for safer installation
Lay out all parts and confirm that nothing is missing. Read the manual completely—even if you’re a seasoned DIYer. The extra 10 minutes can save an hour later.
4. Step-by-Step Guide to Trampoline Setup
Step 1: Begin by assembling the metal frame, connecting all base pieces to create the outer ring.Step 2: Secure legs to the frame and double-check for sturdiness.Step 3: Attach the jumping mat to the frame using the provided springs. Start on opposite sides to evenly distribute tension.Step 4: Set up the safety enclosure poles, making sure they’re properly aligned with the frame.Step 5: Attach the safety net and ladder. Make sure the zipper entry works smoothly.
This process typically takes 2–3 hours, depending on the size of the trampoline and your level of experience.
5. Safety Measures During and After Installation
Installing is just the beginning—ongoing safety is key. Ensure all springs are covered with padded sleeves. Verify that the safety net is taut and fully encloses the bounce area. After installation, do a bounce test yourself before letting kids on. Regularly check for rust, loose bolts, or stretched springs. Many users of Trampoline Zone products set calendar reminders for monthly inspections.
6. Real-Life Experience from a Trampoline Zone Customer
Take the Ramirez family from Sacramento, California. After their first trampoline purchase from Trampoline Zone, they followed the guide carefully. “We loved how straightforward the instructions were. Even my teenage son helped put it together. We added LED lights later, and now it’s the weekend favorite spot for our neighbors,” shared Maria Ramirez. The key to their success? Patience and preparation.
7. Maintaining Your Trampoline Throughout the Seasons
California summers are perfect for jumping, but rain, wind, and even UV rays can wear down your equipment. Invest in a weather cover and consider anchoring your trampoline if your area is prone to gusts. In winter, remove the safety net and mat to prevent damage from freezing temperatures. At Trampoline Zone, seasonal care kits are available to help you maintain your trampoline year-round.


 Let It Shine Gymnastics4.0 (129 reviews)
 Kids & Family Arena4.0 (182 reviews)
 Chuck E. Cheese4.0 (1463 reviews)
 Urban air4.0 (17 reviews)
 Altitude 12914.0 (808 reviews)
 Life Unlimited5.0 (22 reviews)
 Are Trampoline Parks Safe for Kids? Essential Guide for U.S. Parents
 How Much Is a Trampoline? A Detailed Guide to Trampoline Costs and Buying Tips
 How Often Should You Replace Trampoline Springs? Tips for Proper Maintenance
 Bounce Techniques for Stronger Legs: Effective Exercises and Tips
 Essential Music Gear for Trampoline Dance: Complete Guide
 Fun STEM Experiments Using Trampolines to Spark Curiosity and Learning